

How To Repair Mortar Between Bricks
How to Repair Mortar Joints
Restore aging mortar joints with a chisel, a grinder and a lot of patience
![]() Time
Time
Multiple Days
![]() Complexity
Complexity
Beginner
![]() Cost
Cost
Varies
Introduction
Learn the tools and techniques used for tuckpointing former masonry walls and chimneys. Discover how to restore croaky and worn mortar joints, how to cut out erstwhile mortar and how to pack new mortar in neatly and cleanly.
Tools Required
Materials Required
- Mortar mix
Repair Mortar Joints
Brick is i of the most prized exteriors for homes considering it's attractive and piece of cake to maintain. Yet over the years, water, water ice and seasonal expansion and wrinkle all attack the solid mass of a brick wall at its most elastic (and weakest) indicate: the mortar joints.
Mortar joints deteriorate wherever water tin soak them—under windows and walls, around chimneys, behind downspouts, at ground level and at any exposed wall top.
Repairing eroding and croaky mortar joints is called pointing, repointing or tuckpointing. We'll show you the proper tools and techniques to repair and restore cracked and worn-away mortar joints to make them solid, durable and proficient looking. To keep them that way for the long run, you have to end water from getting into your bricks and foundation.
Repointing brick is slow, painstaking work that requires few special skills simply a lot of patience. Using the steps nosotros show, y'all tin can expect to repoint virtually 20 sq. ft. of brick work a day. Even so, if yous blitz and exercise careless work on a highly visible surface area, the repointing brickwork will stick out like graffiti. Brick is durable; bad results will bother you for a long time! If you don't have repointing brick feel, consider hiring a pro for:
- Larger-scale pointing jobs, such as a whole wall that needs repair.
- Chimney and wall repair requiring setting up and moving scaffolding.
- Areas with a lot of loose or missing brick requiring rebuilding walls or corners.
- Color-matching new mortar to existing mortar in highly visible areas.
Read on to learn how to repoint brick.
Project footstep-by-footstep (9)
Step i
Employ an Angle Grinder for Larger, Harder Repointing Brick Jobs
Cleaning out old mortar joints requires basic tools: hammer, flat utility chisel, prophylactic glasses, dust mask and whisk broom. Filling the cleaned-out joints requires masonry tools: brick trowel, 3/8-in. pointing trowel, a special tool for contouring the joints and waterproof gloves.
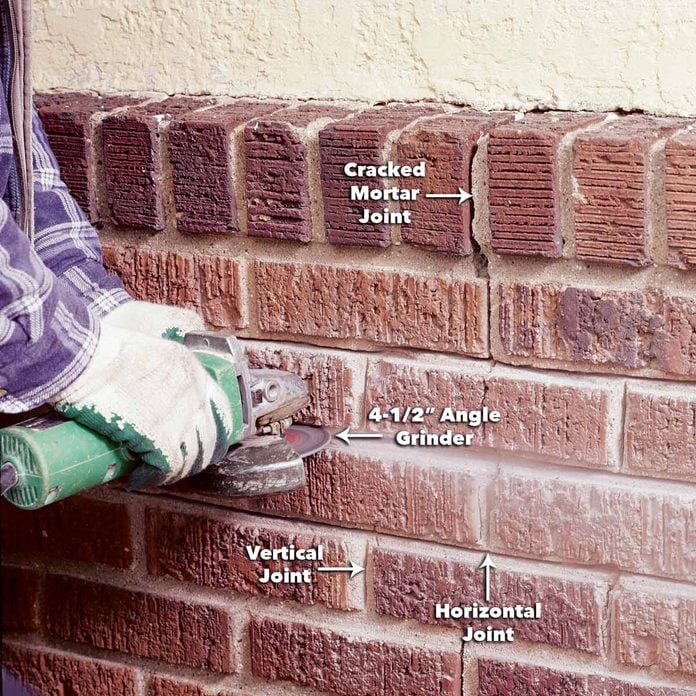
If you practise tackle larger jobs or see hard mortar that can't be easily chiseled out, we recommend that you lot rent or buy an angle grinder fitted with a diamond blade. Select a grinder with a 4-1/two in. blade diameter; larger grinders are harder to control and cut the mortar too deep. To begin, Cutting grooves three/4 to one in. deep in cracked or deteriorating mortar using a iv-one/2 in. bending grinder fitted with a diamond bract. Button the blade into the articulation until the grinder head contacts the brick, and make a single pass along the center of the joints.
Step 2
Chip Out Loose Mortar
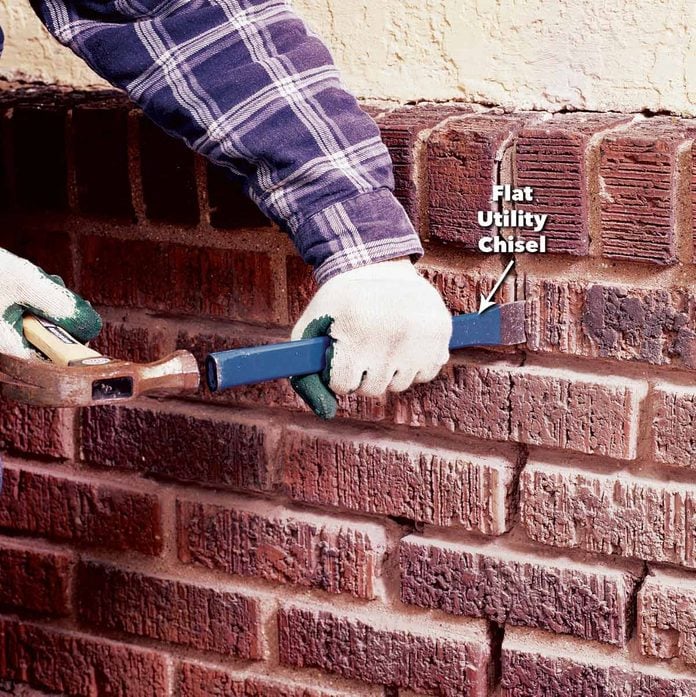
Interruption out old mortar using a hammer and common cold chisel or a apartment utility chisel that'due south narrow enough to fit into the joints. Position a apartment utility chisel at the edge of the brick and drive it toward the relief cut to fracture and remove the mortar. Clothing safety glasses and a dust mask and remove three/4 to 1 in. of onetime mortar (more if needed) until you reach a solid base for bonding the new mortar. If the mortar is and then soft that the bricks are loosening upward, you'll have to remove and properly reset them. If the cracked mortar is harder, make a relief cut downward the eye of the mortar joint using the pointed edge of the chisel so gently chip out the mortar (brick grout) that contacts the brick.
If the removal work is going really slowly, use an angle grinder to make the relief cuts. Exercise care here; the grinder can easily nick and chip the bricks, so don't use it to clean out the mortar contacting the brick. To avoid nicking the bricks, cut the vertical joints before cut the horizontal joints.
![]()
Step 3
Clean the Joints

In one case the old mortar is removed, dust out the brick cavity joints using a whisk broom or compressed air, Fix the joints to receive new mortar by misting them lightly with a garden hose sprayer.
Footstep 4
Mix the Mortar
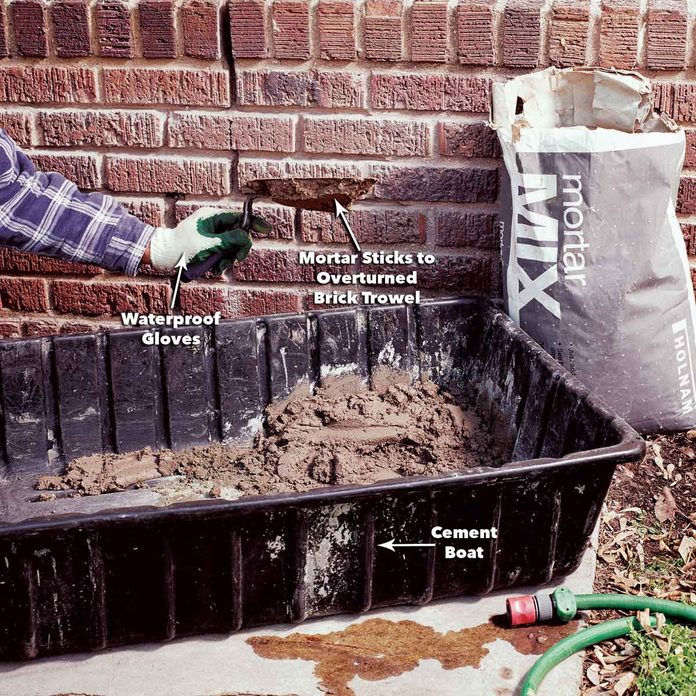
Using but the amount of water specified by the manufacturer, gradually add in the water and mix the mortar in a cement boat until it's the consistency of peanut butter and viscous plenty to cling to an overturned trowel. It should be strong but non crumbly. Permit the mortar to "rest" for ten minutes as information technology absorbs the water, and so remix it using your brick trowel. Don't try to revive mortar that'south drying out by adding more water to it. Mix a fresh batch instead.
Footstep 5
Fill the Joints with Mortar
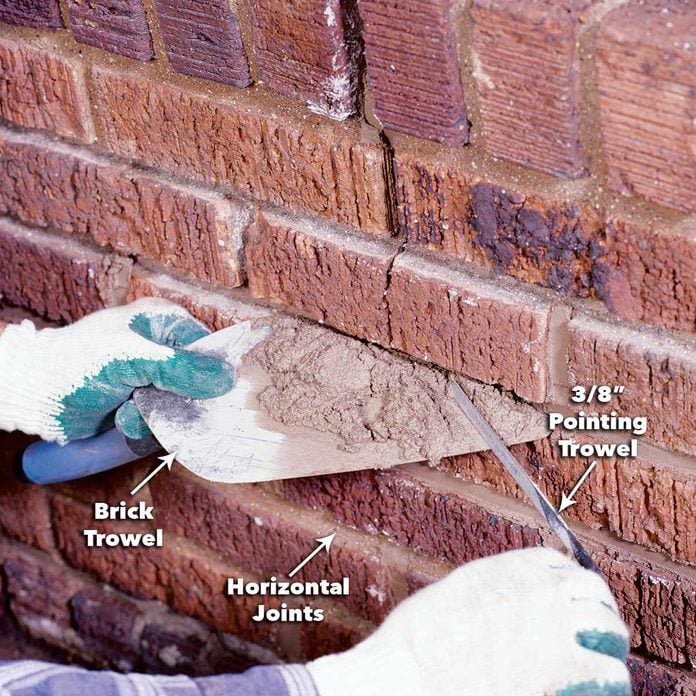
The basic steps for how to mortar brick get-go like this: Load mortar onto an overturned brick trowel, hold the trowel nether the horizontal joint—tight to the brick—and sweep ane/4-in. slivers of mortar into the cavity using a 3/eight-in. broad pointing trowel. Fill the horizontal joints get-go. Avoid getting mortar on the brick confront.
Follow these additional tips for filling mortar joints:
- Pack the mortar tightly with no voids for the strongest, almost water-resistant joints.
- Fill deeper joints (those greater than 3/4 in.) in two stages. Allow the start layer to partially harden (until a thumbprint barely leaves an indentation) earlier calculation the second layer.
- In hot weather condition, piece of work in shaded areas start (if possible) so the dominicus won't dry the mortar likewise fast. Mix smaller batches of mortar.
- Don't work in temperatures below forty degrees F.
Step 6
Fill the Vertical Joints Final
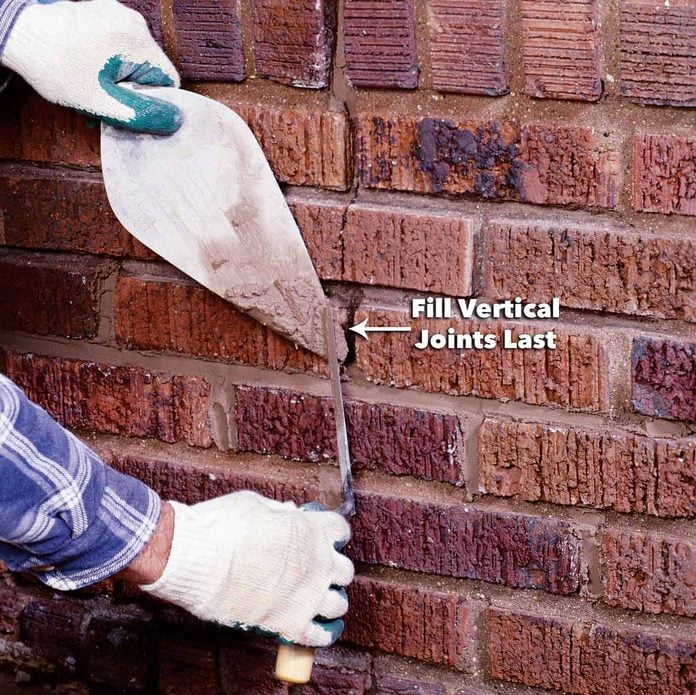
Load smaller amounts of mortar onto the dorsum of the brick trowel, hold the trowel tip forth the vertical joints and above the horizontal joints—tight to the brick—and then sweep and pack the mortar into the cavity using the pointing trowel.
Step 7
Figure A: Common Mortar Joint Profiles
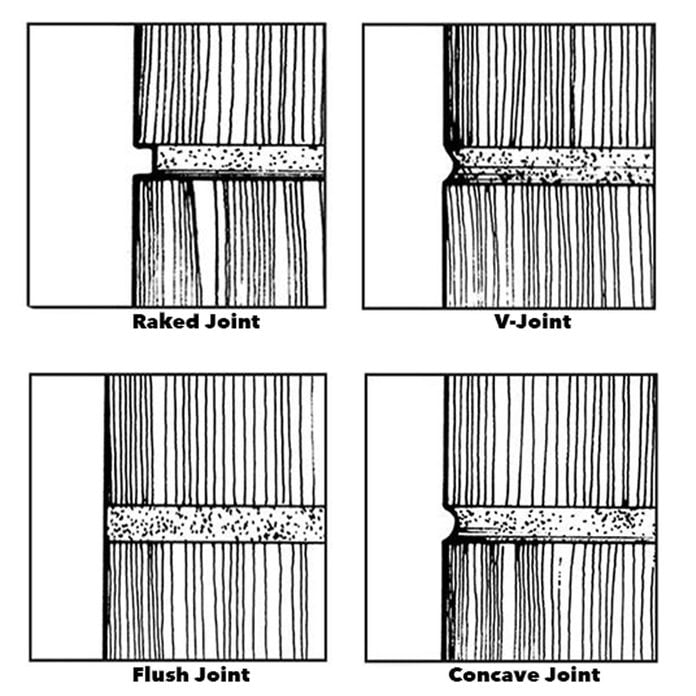
Before finishing the mortar articulation, determine which joint matches your existing joints using Effigy A to a higher place. Adjacent, purchase the mortar finishing tool you lot need to match the contour and depth of your existing mortar joints. We recommend that y'all repoint brick sills and other horizontal brick surfaces (ledges, wall tops, etc.) with affluent joints to promote drainage—regardless of the type of mortar joint in your vertical walls. Allow the mortar to cure to "thumbprint" hardness before you stop the joint. Shape the vertical joints earlier working the long horizontal joints. These are the nearly common mortar articulation profiles:
- Raked joint: Formed by removing mortar to one/four in. deep with a raking block.
- V-Joint: Formed past a brick jointer, it has a concave, "V" look.
- Flush joint: Formed by cutting off the mortar with the border of a brick trowel.
- Concave joint: Formed by the curved end of a brick jointer.
Footstep 8
Rake the Joints
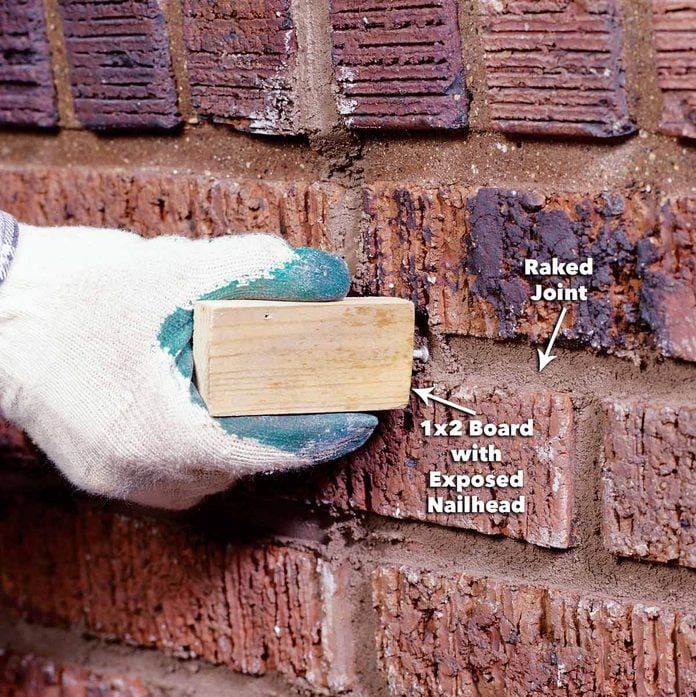
For this projection, we used a raked articulation mortar contour. To brand your own raked joint tool, bulldoze a 6d box blast into a short 1x2 board so that it matches the depth of the existing joints. To "rake" joints, agree the board perpendicular to the bricks and move information technology dorsum and forth, first along the vertical joints and so the horizontal joints. Other articulation profiles require other shaping tools.
Step 9
Clean the Bricks
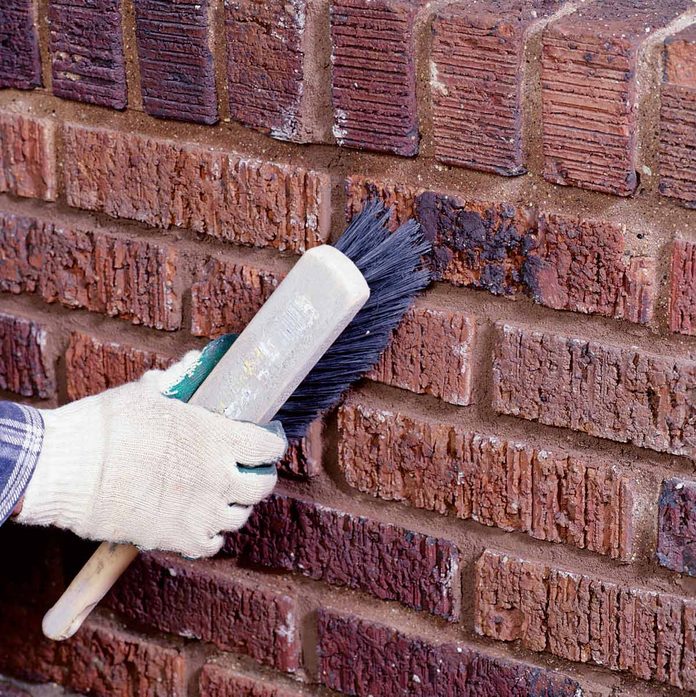
Use a soft-bristle castor to remove mortar chunks on the brick face before they harden and to sweep loose mortar from the finished joints. The castor keeps the mortar from smearing. If you practise smear mortar onto the brick, you'll have to become back after and utilise a chemical cleaner. Preclude water from inbound and damaging your brickwork past applying color-matched polyurethane caulk where stucco, wood and other materials encounter brick. Mist the new mortar twice a day for ii days using a hand pump sprayer or a low-cal mist from a garden hose to assist information technology harden.
Plus, cheque out How to Repair Broken Bricks.
Originally Published: June 26, 2022

How To Repair Mortar Between Bricks,
Source: https://www.familyhandyman.com/project/how-to-repair-mortar-joints/
Posted by: hamilscolon.blogspot.com
0 Response to "How To Repair Mortar Between Bricks"
Post a Comment